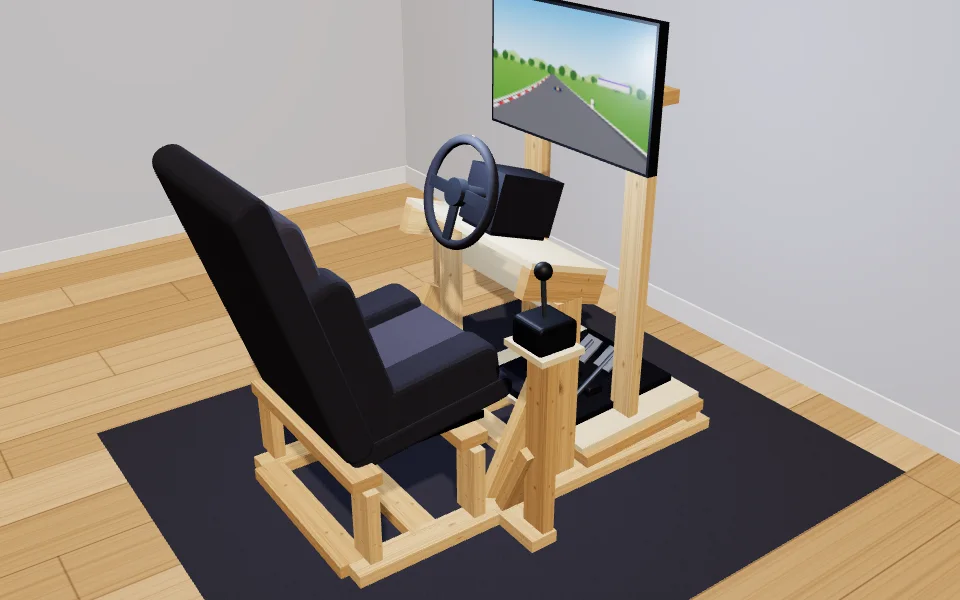
What you are building
Two 2x4 rails stood on edge make the base, 4 ft 5 1/8 in long, with cross members screwed between them. Everything else is built on that base, part by part, in the order you would build it:
- Seat mount. Two bars laid across the rails on risers 8 3/4 in tall. A bucket seat's side brackets or a car seat's sliders bolt through the bars with M8 bolts, which puts the hip point 19 1/4 in above the floor.
- Pedal deck. Two stringers laid flat and tilted 3 degrees, a cross brace under the front edge, and a plywood plate 25 1/16 in wide on top. Your heels rest 26 1/4 in ahead of the hip point.
- Wheel deck. Two posts carry a pair of rails tilted to 18 degrees, braced down to the base ahead of them, with a strip of plywood between the posts above your knees. The wheel base bolts to a plate 25 1/16 in by 11 7/16 in.
- Shifter arm. An arm out from the right-hand rail, a post at its end and a brace back to the rail, under a small plate for the shifter.
- Screen stand. Two feet, two posts and a bar, free of the rig, so the screen does not shake when the wheel kicks. The bar is 47 9/16 in up to the screen's centre.
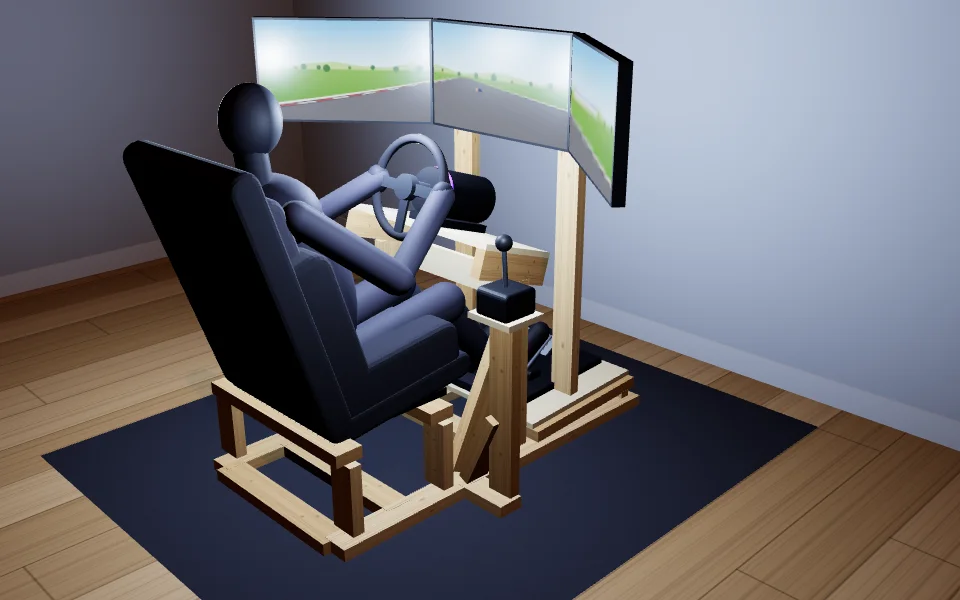
Every piece of 2x4
The lengths below are what you cut, rounded up to the next 1/16 in. They assume dry, planed 2x4 at its real size of 1 1/2 by 3 1/2 in, the size the American Softwood Lumber Standard gives for a nominal 2x4. Angled ends are cut after the piece is cut to length.
| Piece | Count | Cut length |
|---|---|---|
| Base | ||
| Left side rail | 1 | 53 3/16 in |
| Right side rail | 1 | 53 3/16 in |
| Cross member | 4 | 22 1/16 in |
| Seat mount | ||
| Bar across the rails (laid flat) | 2 | 25 1/16 in |
| Riser | 4 | 8 3/4 in |
| Pedal deck | ||
| Cross brace | 1 | 22 1/16 in |
| Stringer (laid flat, ends cut to the angle) | 2 | 20 1/8 in |
| Spacer block, top cut to the angle | 2 | 15/16 in |
| Wheel deck | ||
| Post, top cut to the deck angle | 2 | 22 15/16 in |
| Brace (both ends cut to the angle) | 2 | 17 5/8 in |
| Rail on edge, ends cut square to it | 2 | 11 7/16 in |
| Shifter | ||
| Post | 1 | 22 3/16 in |
| Brace (both ends cut to the angle) | 1 | 10 7/16 in |
| Arm out from the base (on edge) | 1 | 7 1/8 in |
| Screen stand | ||
| Post | 2 | 48 5/8 in |
| Bar across | 1 | 27 3/8 in |
| Foot | 2 | 20 1/2 in |
The free tool lists these pieces for your own design. Pro packs them onto boards with a cutting diagram for each one, and prints the build plan with every dimension.
The plywood
| Piece | Size |
|---|---|
| Wheel deck, apron between the posts (above the knees) | 4 1/4 in x 22 1/16 in |
| Wheel deck plate | 11 7/16 in x 25 1/16 in |
| Pedal plate | 20 1/16 in x 25 1/16 in |
| Shifter plate | 5 1/2 in x 6 5/16 in |
The gear bolts through the plates, so their holes have to match your wheel base, pedals and shifter. The tool asks you to measure them; the design still carries example patterns, flagged in its checks until you tick them as measured.
Screws, bolts and glue
- Wood screws, 3 in: 232 screws. Four at each joint, plus a tenth spare. Drill pilot holes near the ends.
- Wood screws for the plates and panels, 1 1/2 in: 33 screws. Every fixing hole in the plates, about twelve for each panel, plus a tenth spare.
- Wood glue: 1 bottle. On every panel joint and cleat.
- M8 bolts, washers and nyloc nuts through the seat bars: 4 sets. Check the thread your seat brackets or sliders take.
- A VESA bracket for the screen on the bar: 1 bracket. Match the VESA pattern on the back of your screen.
- Bolts, washers and nuts for the wheel deck plate (6.5 mm holes): 4 sets. Bolt size to suit the threads in your gear.
- Bolts, washers and nuts for the pedal plate (8.5 mm holes): 6 sets. Bolt size to suit the threads in your gear.
- Bolts, washers and nuts for the shifter plate (6.5 mm holes): 4 sets. Bolt size to suit the threads in your gear.
The numbers your body sets
| Position | This design |
|---|---|
| Hip point above the floor | 19 1/4 in (489 mm) |
| Hip point above the heel point (H30) | 13 9/16 in (344 mm) |
| Heel point ahead of the hip point (L53) | 26 1/4 in (666 mm) |
| Seat back from upright | 18 degrees |
| Pedal deck tilt | 3 degrees |
| Wheel centre above the hip point | 17 7/16 in (443 mm) |
| Wheel centre ahead of the hip point | 14 3/4 in (374 mm) |
| Wheel tilt from upright | 18 degrees |
| Eyes to the screen | 33 3/4 in (857 mm) |
| Knee, hip and elbow | 117, 97 and 105 degrees |
Type a different height and the tool moves the parts, not just the numbers. For a driver of 6 ft 2 in it puts the heels 1 7/16 in further forward, raises the wheel centre by 2 in and the hip point by 7/8 in, and then sizes every piece again. Open the 6 ft 2 in version to compare.
Is 2x4 stiff enough for the wheel?
This design has a belt-drive wheel base, which pulls on the deck less than a direct drive motor does. No study or standard gives a number for how stiff a wheel deck has to be, so the tool does not pretend to calculate it. What it does: braces the posts down to the base, ties them together with the plywood strip, and, when you choose a direct drive base, adds a check that asks you to grab the rim and twist it hard once the rig stands. If the deck moves, add a brace before you race. Asetek's ergonomics guide makes the same point from the other side: the stronger the force feedback, the more any flex in a setup shows.
Build order
- Base frame. Cut the two side rails and the cross members, stand the rails on edge and screw the cross members between them, two screws a side into pilot holes. Square the frame by its diagonals.
- Seat mount. Fix the two seat bars across the rails on their risers (8 3/4 in tall), then bolt the seat brackets or sliders to them. Sit in it before you go on: the hip point should be 19 1/4 in above the floor.
- Pedal deck. Fix the stringers at 3 degrees on their spacer blocks, the cross brace under the front, then the pedal plate. Your heels rest 2 3/8 in from its back edge.
- Wheel deck. Stand the two posts on the rails, fix the deck rails across their tops at the deck angle, the braces down to the rails ahead, and glue and screw the front panel between the posts. Screw the wheel plate on top.
- Shifter. Fix the arm out from the right side rail, the post at its end, the brace back to the rail, and the plate on top.
- Screen stand. Build the stand: two feet, two posts and the bar across at 47 9/16 in to its centre. Stand it so the screen is 33 3/4 in from your eyes.
- Gear and fit. Bolt the wheel base, the pedals and the shifter to their plates, sit in, and check each angle in the checks table. Adjust the seat, the deck angles and the screen until they fit.
The plan assumes a bucket seat with side brackets. A car seat on sliders sits higher and an office chair needs the plywood wheel stand instead; pick your seat type in the tool before you buy wood, and every height follows it.